Os produtos são armazenados e expedidos diretamente dos Estados Unidos, a partir de nosso centro logístico na Flórida, com envio ao consumidor final no Brasil. Não mantemos estoque nem realizamos comercialização local em território brasileiro, assegurando uma operação internacional direta e o fornecimento de produtos provenientes de canais oficiais nos Estados Unidos.
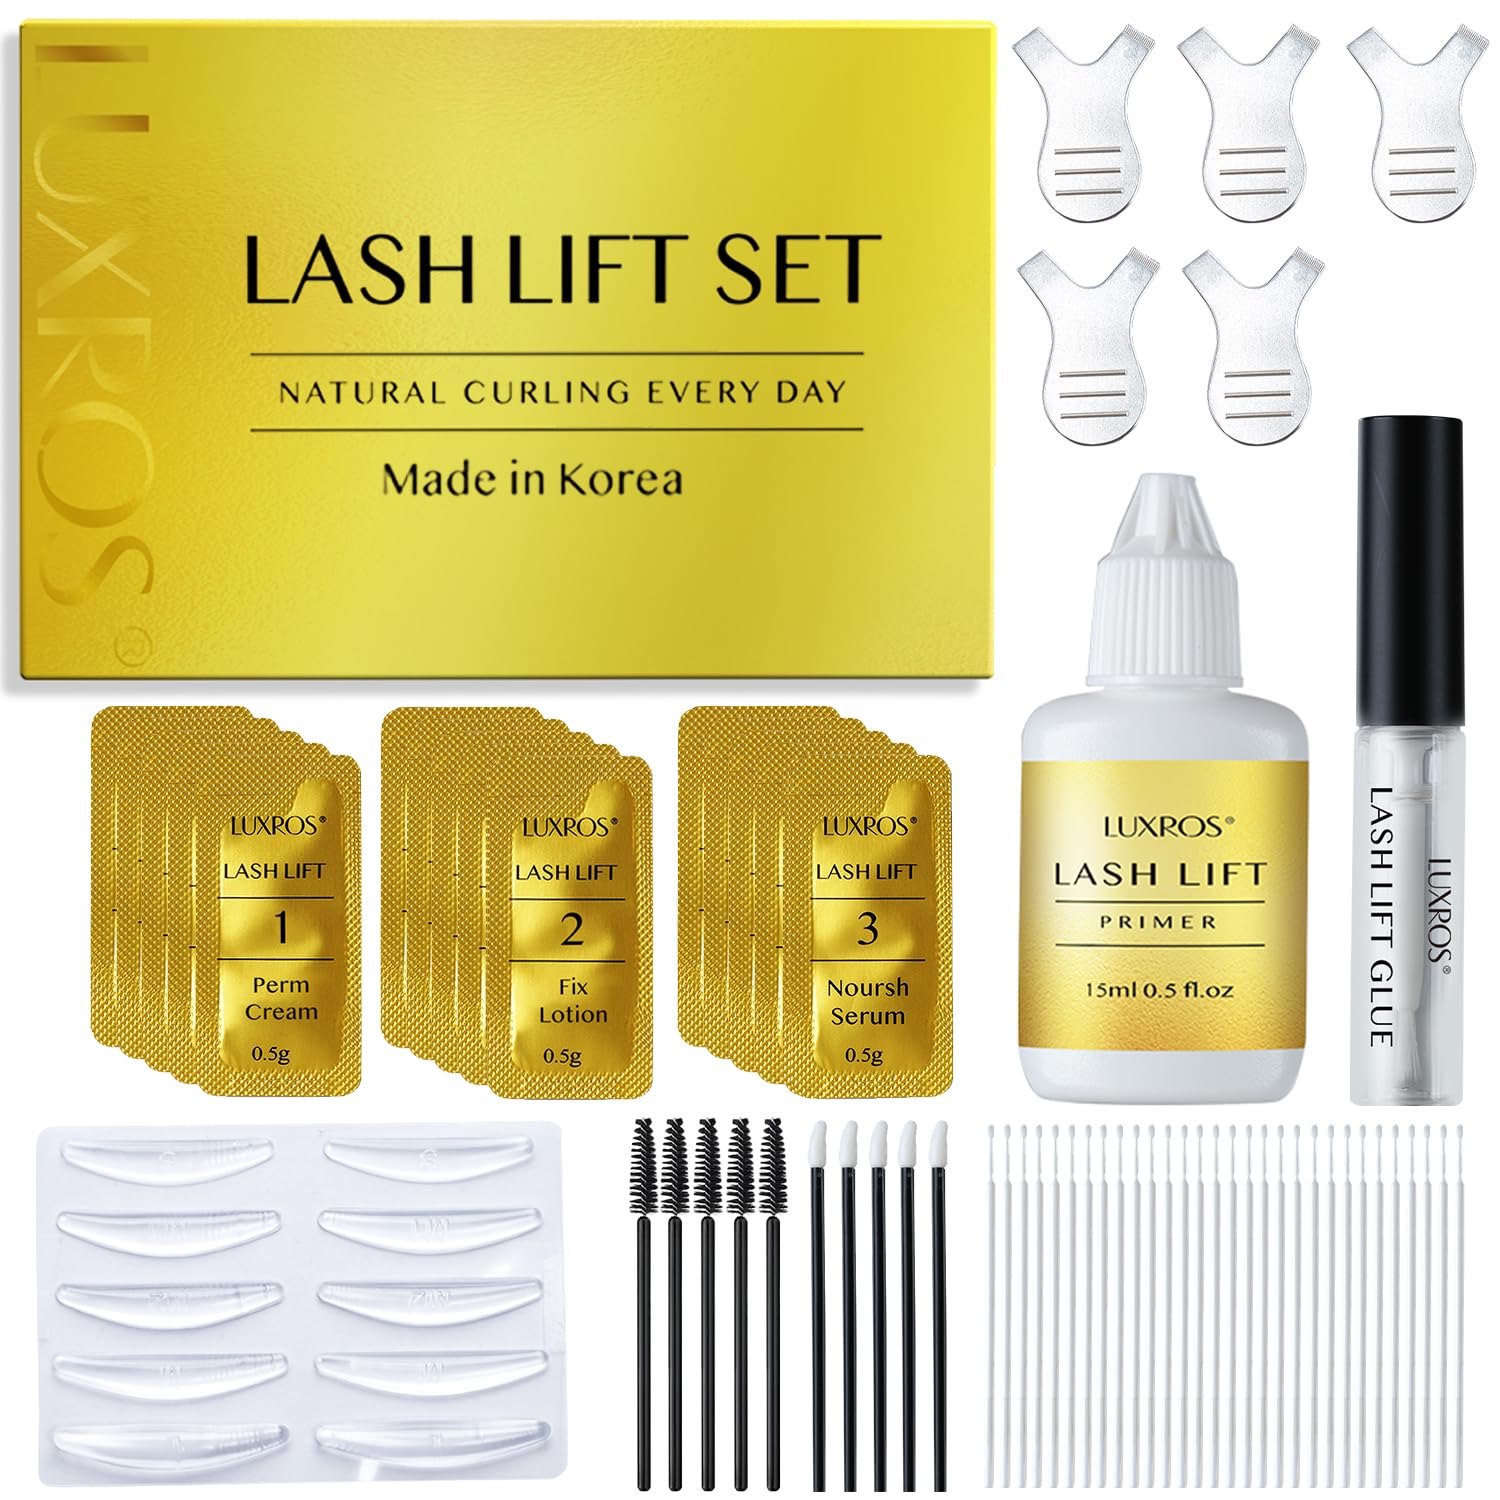
Lash Lift Kit, Eyelash Lift Kit, Professional Eyelash Extensions,Semi-Permanent Curling Lash Perm Kit, Long Lasting Wave Lash Curling for Home or Salon Use Beautify Your Lashes
3,6(8)
R$234,90
Os tributos e taxas de importação já estão incluídos no valor do produto. Você não terá custos extras. Para mais informações sobre taxas de importação e tempo de entrega, consulte nossa Política de Entrega.
em até 6x de R$39,15 sem juros
Em estoquerestam 4 em estoque, aproveite
5%
Desconto de primeira compra
Exclusivo para novos clientes
Aplicar
Cupom de 5% aplicado!Clique em "Comprar Agora" acima e finalize ↑
Entrega gratuita para todo o Brasil. Sem custo adicional de frete.
Produtos autênticos adquiridos de marcas e distribuidores autorizados nos EUA.
Avaliação média de 4.8 estrelas com base em milhares de clientes satisfeitos.
Não ficou satisfeito? Devolvemos seu dinheiro em até 7 dias após a entrega.
✿✿【Lash Lift Kit】The lash perm kit includes curling perming wave liquid set, lash lifting tools, eye patch, micro mascara brush.Creating a flipped-up curl on your natural eyelashes is a better way to go than using fake lashes.Eyelash perm kit is made with premium quality ingredients, your lashes will remain curled for 1 month, you will obtain long-lasting eyelash.
✿✿【Safe Formula Lash Lift Kit】Our eyelash lift kit is safe and premium quality, non-irritating, and mild when using on the eyes. Eyelash perm kit have been passed many tests before it is sold, and the results show that it is effective and safe, suitable for home and professional salons.
✿✿【Long Lasting Eyelash Perm Kit】After using it,which can let your eyes look more big and charming, eyelashes are naturally curly, thick and long.Perfect for people who crave that extra curl for their natural lashes.The effect is like a professional salon.And the staying power is relatively good. According to the operating instructions, it can last for more than one month without eyelash curlers and other eyelash products.
✿✿【Saving Time & Money】The easy-to-use eyelash curling products are not only cheap but also large in capacity, which can be used more than 15 times, avoiding high costs and saving time, space and money.
✿✿【Easy to Use】The eyelash lifter kit is very easy to use, even beginners can create long and curve eyelashes. 💕1. Clean the eyelashes.💕2. Put the lifting pad on the eyelashes, then apply glue on the eyelashes and keep it on the pad for 1 minutes.💕3. Apply Perm agent and fixative sequentially and keep for 8-10 minutes respectively. Then use nutrients to nourish the eyelashes, and finally use a cleanser to remove all perm residue.This lash lift kit works great on all types of lashes.
☞☞ Direction For Use : 1. Use the cleanser #4 to remove the oil, dust, and makeup residue. 2. Place under eye pads on the lower eyelids making sure all the bottom lashes are covered. This should separate the top and bottom lashes. Avoid the perm lotion touching the skin. 3. Select the appropriate size lash lift pads(S/M/M1/M2/L) to match the length for your lashes. Tip: Small size, more curl. 4. Apply the glue to the back of the lash lift pads, wait for 20 seconds, and then put them on your eyelids. As close to your lash line as possible. 5. Apply the glue to the front of the lash lift pads and then use a Y brush to lift the lashes from the root back onto the pads.The lashes should be aligned and not crossing each other. Top Tip: No need to put too much glue, it needs to wait for 30-60 seconds then put the lashes on. 6. Use the perm lotion #1 on the eyelashes and then cover your eyelashes with a plastic wrap. (Perming time: 10--12 minutes) 7. Remove the perm lotion #1 with Y brush,then apply fixing agent #2 on the eyelash and then cover your eyelash with a plastic wrap. (Fixing time: 10--12 minutes) 8. Use the cleanser #4 to clean off all residue with the Y brush ,wiping with the comb side. 9. Remove the lift pads from the upper part of your eyelid, then use the nutrition lotion #3 to nourish your eyelashes. ☞☞ Safety Precaution: 1. Please remove contact lenses before usage. Make sure the solutions do not touch your skin.If you have red eyes or any other eye conditions,please stop immediately. 2. Lash lift kit only use for eyelash. If the solutions get into your eyes or cause irritation, flush your eyes with cool water for 15 minutes and seek medical attention immediately. 3. If you have sensitive skin or are prone to reactions, use a patch test before usage.
8 avaliações para Lash Lift Kit, Eyelash Lift Kit, Professional Eyelash Extensions,Semi-Permanent Curling Lash Perm Kit, Long Lasting Wave Lash Curling for Home or Salon Use Beautify Your Lashes
Avaliação 2 de 5
Kelsea. –
Honestly, a headache.
I had some high hopes for this lash lift kit, but honestly, it was a little difficult to use. I’ve used lash lift kits in the past on myself, and although it can be difficult to do on yourself, it’s not impossible. I went into this with realistic expectations from my previous experience.This kit comes with under eye pads for protection, a small roll of gentle paper tape, applicators and spoolies, lash glue, pads for your eyelids, and 4 tiny jars containing the perming solution, fixator, cleasing, and an oil for nutrition.Most of this kit was great. The cute little jars with the solutions needed for the perm were as expected and worked perfectly. The silicone pads for your upper eyelid were also as expected.My largest complaint is with the undereye pads and the lash glue. Despite using on freshly cleaned skin, the undereye pads just would not stick. After falling off repeatedly, I threw them way and used the paper tape included to tape my lower lashes down to protect them, which worked just as well. The lash glue was the most difficult part of this kit though. It was thick and sticky, but never seemed to fully dry down to keep anything in place. The silicone pads would slide around, and my eyelashes stay adhered to the pads, I ended up throwing it away entirely and using glue I had of my own, which worked significantly better.
Avaliação 3 de 5
darlene del (comprador verificado)–
Mid
lash gummy tabs do not stick well and the glue burns a bit, It works sometimes. You get what you paid for.
Avaliação 1 de 5
Adriana Ortiz (comprador verificado)–
No funciona a mi gusto
El producto apenas ayer lo apliqué por qué no había tenido el tiempo y la verdad que no funciona correctamente en mi opinión el enraizado es mínimo y no dura obviamente por qué siento que no está trabajando debidamente no creo darle una segunda oportunidad y aparte los plásticos no vienen completos
Avaliação 4 de 5
Mona Osorio (comprador verificado)–
Always happy with product
Never fails me.
Avaliação 4 de 5
Summer (comprador verificado)–
9/10
As a person who has never gotten lash extensions or a lift, this was pretty easy to use. Only complaint is the lash glue is chunky when dry but comes off easy. So far my lashes have been curled for over a week.
Avaliação 5 de 5
Kaly Kutrip (comprador verificado)–
Great Product!
This product is legit! My eyelashes are done and look professional. The directions make it easy to use and follow step-by-step! Definitely recommend.
Avaliação 5 de 5
Tiani Adams (comprador verificado)–
Love!!
Update 5.6.26 it has been almost 4 weeks and my eyelashes are still curled! This has saved so much time getting ready because I don’t feel like I need mascara when my eyelashes are like this. I’m so thankful for this product and I’m so glad I found it.Amazing!! I’ve never used/or done anything like this before and I am so impressed! I used mascara the next day (which was not recommended) but the curl held up after I washed my face! Super easy to use too 10/10, left pics are before and the right is right after
Avaliação 5 de 5
Marianys (comprador verificado)–
Way better than paying a lash tech
I used to pay around $120 for my lashes, but I finally decided to learn how to do them myself and honestly, I’m so glad I did. It took me a little while to get the hang of it, but for my first time ever, I think they turned out pretty good!The hardest part was definitely applying the base (sorry, I don’t know the exact name for it), but once I got past that, the rest wasn’t too bad. For someone like me who doesn’t baby their lashes, I’m really impressed with how well they’ve held up. I wash my face daily, and even though I know you’re not supposed to rub your eyes… I still do. And yet, they’ve lasted super well.I even included pictures of what they look like after a month, so you can see for yourself. Honestly, if you’re thinking about doing your own lashes, go for it. Service prices keep going up even though the materials don’t. Learning the skill was totally worth it for me!


Kelsea. –
Honestly, a headache.
I had some high hopes for this lash lift kit, but honestly, it was a little difficult to use. I’ve used lash lift kits in the past on myself, and although it can be difficult to do on yourself, it’s not impossible. I went into this with realistic expectations from my previous experience.This kit comes with under eye pads for protection, a small roll of gentle paper tape, applicators and spoolies, lash glue, pads for your eyelids, and 4 tiny jars containing the perming solution, fixator, cleasing, and an oil for nutrition.Most of this kit was great. The cute little jars with the solutions needed for the perm were as expected and worked perfectly. The silicone pads for your upper eyelid were also as expected.My largest complaint is with the undereye pads and the lash glue. Despite using on freshly cleaned skin, the undereye pads just would not stick. After falling off repeatedly, I threw them way and used the paper tape included to tape my lower lashes down to protect them, which worked just as well. The lash glue was the most difficult part of this kit though. It was thick and sticky, but never seemed to fully dry down to keep anything in place. The silicone pads would slide around, and my eyelashes stay adhered to the pads, I ended up throwing it away entirely and using glue I had of my own, which worked significantly better.
darlene del (comprador verificado) –
Mid
lash gummy tabs do not stick well and the glue burns a bit, It works sometimes. You get what you paid for.
Adriana Ortiz (comprador verificado) –
No funciona a mi gusto
El producto apenas ayer lo apliqué por qué no había tenido el tiempo y la verdad que no funciona correctamente en mi opinión el enraizado es mínimo y no dura obviamente por qué siento que no está trabajando debidamente no creo darle una segunda oportunidad y aparte los plásticos no vienen completos
Mona Osorio (comprador verificado) –
Always happy with product
Never fails me.
Summer (comprador verificado) –
9/10
As a person who has never gotten lash extensions or a lift, this was pretty easy to use. Only complaint is the lash glue is chunky when dry but comes off easy. So far my lashes have been curled for over a week.
Kaly Kutrip (comprador verificado) –
Great Product!
This product is legit! My eyelashes are done and look professional. The directions make it easy to use and follow step-by-step! Definitely recommend.
Tiani Adams (comprador verificado) –
Love!!
Update 5.6.26 it has been almost 4 weeks and my eyelashes are still curled! This has saved so much time getting ready because I don’t feel like I need mascara when my eyelashes are like this. I’m so thankful for this product and I’m so glad I found it.Amazing!! I’ve never used/or done anything like this before and I am so impressed! I used mascara the next day (which was not recommended) but the curl held up after I washed my face! Super easy to use too 10/10, left pics are before and the right is right after
Marianys (comprador verificado) –
Way better than paying a lash tech
I used to pay around $120 for my lashes, but I finally decided to learn how to do them myself and honestly, I’m so glad I did. It took me a little while to get the hang of it, but for my first time ever, I think they turned out pretty good!The hardest part was definitely applying the base (sorry, I don’t know the exact name for it), but once I got past that, the rest wasn’t too bad. For someone like me who doesn’t baby their lashes, I’m really impressed with how well they’ve held up. I wash my face daily, and even though I know you’re not supposed to rub your eyes… I still do. And yet, they’ve lasted super well.I even included pictures of what they look like after a month, so you can see for yourself. Honestly, if you’re thinking about doing your own lashes, go for it. Service prices keep going up even though the materials don’t. Learning the skill was totally worth it for me!